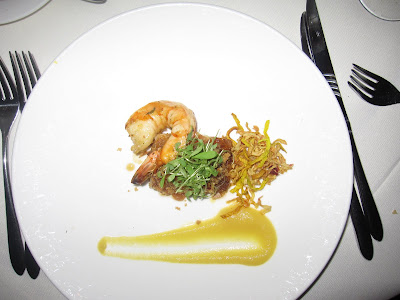
Friday, January 29, 2010

Gâteau de Crêpes


I’ve been meaning to make this recipe that I found on nytimes.com a while back for some time now. Sometimes I read a recipe and it burrows into a corner of my brain, gathers dust, and refuses to move out until I make it. Well this recipe is based off of the famed specialty at Lady M Boutique on the Upper East Side. I myself have never been, but I heard the stories of its utterly delicious baked goods.

So here’s the basic idea of a Gâteau de Crêpes: 20 layers of crepes filled will cream and an endless choice of sweet fillings. It’s a modern twist of the classic French pastry mille feuille (thousand leafs), which is a whole bunch of flaky, buttery layers of pastry filled with cream and it very traditional in French cuisine.

The recipe calls for vanilla pastry cream in the original recipe, but I’m a big fan of dulce de leche so I wanted to implement that as my filling. I had to thin it a bit with some cream because it’s just so thick and luscious.

Gâteau de Crêpes

New York Times, 5/15/05 who adapted the batter from ”Joy of Cooking” and the pastry cream from ”Desserts,” by Pierre Herme and Dorie Greenspan.

For the crepe batter:


6 tablespoons butter 


3 cups milk 


6 eggs


1 1/2 cups flour


7 tablespoons sugar


Pinch salt 


1 can Dulce de leche

1 cup cream ( I had leftover whipped cream from my hot chocolate, so I used that)


Directions

  1. The day before, make the crepe batter. Batter: In a small pan, cook the butter until brown like hazelnuts. Set aside. In another small pan, heat the milk until steaming; allow to cool for 10 minutes. In a mixer on medium-low speed, beat together the eggs, flour, sugar and salt. Slowly add the hot milk and browned butter. Pour into a container with a spout, cover and refrigerate overnight.

  2. Assemble the cake the next day: Bring the batter to room temperature. Place a nonstick or seasoned 9-inch crepe pan over medium heat. Swab the surface with the oil, and then add about 3 tablespoons batter and swirl to cover the surface. Cook until the bottom just begins to brown, about 1 minute, then carefully lift an edge and flip the crepe with your fingers. Cook on the other side for no longer than 5 seconds. Flip the crepe onto a baking sheet lined with parchment.

  3. Repeat until you have 20 perfect crepes.
  4. Lay 1 crepe on a cake plate. Using an icing spatula, completely cover with a thin layer of whipped cream.


  5. Place another crepe on top and spread a thin layer of the dulce de leche on it.

  6. Cover with a crepe and repeat to make a stack of 20, with the best-looking crepe on top.
  7. Chill for at least 2 hours. Set out for 30 minutes before serving.
  8. If you have a blowtorch for creme brulee, sprinkle the top crepe with 2 tablespoons sugar and caramelize with the torch.

  9. Slice like a cake. Batter adapted from ''Joy of Cooking.''

Being a chef...


http://ouichefcook.com/?p=5577

This is a really honest perspective on being a chef, giving the pros and cons of this very rewarding profession. While you've got to work nights and weekends and most holidays, you get to do what you love and have a passion for.

This article really helped me cement my reasoning for hoping to become a chef. While I know none of this can happen until I get a job in the food industry, it helps to know what i'm getting into.

There is one thing I know I don't wanna do in life, and thats working in a tiny cubicle in a 9-5 office job. It'd drive me crazy, doing the same thing over and over, and thats why I love to cook so much, you never have to do the same thing, it lets you take hold of your creative and make endless possibilities.

I love the little details of cooking too. I enjoy getting that perfect chop on an onion, that hard to reach medium rare of a cut of meat, the golden brown crust on a baked good. These are the things I enjoy and hope to enjoy further in my culinary career.

Monday, January 25, 2010

Mexican hot chocolate with Tequila scented whipped cream


This is my riff on the traditional hot chocolate with a little Mexican twist. The Mexican hot chocolate is so thick and creamy, so much better then the crappy powdered stuff you get here in the super market. The Mexican cinnamon is flaky and has such intense flavor that you just can’t get around here. Not to mention the Mexican chocolate itself, its so rich and dark, perfect chocolate in my opinion. This drink is a perfect way to begin or end a day. And with most Mexican drinks, a little tequila is added for kick.

(The good stuff.)

Mexican hot chocolate with tequila scented whipped cream

1.5 oz Mexican chocolate, finely chopped

1 ½ cups heavy cream

1 ½ cups whole milk

1 stick Mexican cinnamon

½ cup packed brown sugar

1 Tbsp tequila

1 tsp vanilla

½ cup heavy cream

1 Tbsp confectioner’s sugar

Directions

  1. Heat milk, cream, sugar, and cinnamon in a pan until sugar melts.

  2. Using a double boiler, melt chocolate.
  3. Strain milk-cream mixture into chocolate, stir vigorously.
  4. To make whipped cream, after freezing bowl and beaters for 20 minutes pour cream, tequila, vanilla and sugar and beat until fluffy.

Friday, January 22, 2010

X2O: culinary salvation in downtown Yonkers

It was my grandmas 80th birthday last Thursday, so we wanted to go out somewhere special to celebrate. The past birthday we went to Peter Kelly’s X2O restaurant in downtown Yonkers, and it was great in every-way; the services were very nice and helpful, and the food was awesome. It was so good that we decided to go again this year, and it certainty did not disappoint. The menu was similar to the last time we went, with a few changes, some that are springing up all across places in New York, steamed buns. And Mr. Kelly gets it right here, with BBQ duck, it’s without a doubt inspired by Momofukus pork buns but with Kelly’s own twist.

All three times I’ve been to X2O I’ve left wondering why Peter Kelly would out such a great, upscale place in a run-down part of Yonkers. But, it doesn’t really matter, as I would keep going back wherever it is. It’s probably one of the best meals you can get in Westchester.

Now, to the food, which was utterly spectacular. Every dish was completely thought out, every detailed was accounted for, the flavor-full, presentation and taste were all beautiful. For lack of a better word everything was outstanding.

The first two dishes was the Ravioli with short rib and foie gras filling in truffle butter with broccoli rabe ($11.50) and braised Berkshire pork belly and grilled shrimp ($12.50). both were extremely satisfying. The ravioli was so rich and fatty, it was a prefect start to the meal. The short rib and foie gras filling was mouth-watering; the short ribs were as tender as can be, aided by the fatty foie gras, it was a match made in heaven. The pork belly with shrimp was some of the best pork belly I’ve ever had. It had the thick, creamy layer of fat that makes pork belly my favorite cut of meat, and the shrimp lightened what would’ve been a heavy dish with just the belly.

For the entrée, I got the hoisin glazed duck breast with BBQ duck steamed bun with mustard greens ($29.00). The bun evoked luscious memories of Momofuku, but with the smoky duck, it worked quite well; I wasn’t missing the usual pork belly. The hoisin-glazed duck was perfectly cooked, had a beautiful crispy crust with let way to a rich, rare ducky breast.

The dessert was presented beautifully; I had the frozen caramel soufflé ($8.50). It had the consistency of a creamy gelato; it was a very refreshing end to a perfect meal, but there was really too much of it (there is such a thing as too much of a good thing) and the doughnuts were a little dense, and lacked cardamom flavor.

Overall, while quite expensive, X2O will provide an upscale dinning experience that you just can’t get in most places in Westchester, especially in Yonkers. All three times I’ve been, I’ve yet to have a bad dish, and quite frankly, I don’t think I ever will.


Xaviars X2O | 71 Water Grant Street | Yonkers, NY | 914.965.1111

Wednesday, January 20, 2010

French style chocolate macarons


I first had macarons while in Paris a few years ago, and they were such a new and exciting thing that I never had in the States. These little bites were so unique and versatile; crunchy, chewy, creamy, sweet, savory and just flat-out awesome. I also loved the fact that the flavors were not just limited to basic dessert flavors like chocolate and vanilla, but exotic ones like foie gras, rose, pistachio and lavender.

My mom and I had be meaning to make then ever since we got back from France, but we just haven’t gotten a chance till now, and it really wasn’t that difficult. While it’s not easy to make good macarons, I think we just got lucky with a good recipe, because I’ve had some pretty bad ones and there’s quite a difference.

Chocolate Macarons ( adapted from Seriouseats.com)

225 grams icing sugar


125 grams ground almonds


110 grams egg whites (about 4), aged overnight at room temperature


30 grams granulated sugar


Pinch of salt

Directions

1. Push almond flour through a tamis or sieve, and sift icing sugar. Mix the almonds and icing sugar in a bowl and set aside. If the mixture is not dry, spread on a baking sheet, and heat in oven at the lowest setting until dry.

2. In a large clean, dry bowl whip egg whites with salt on medium speed until foamy. Increase the speed to high and gradually add granulated sugar. Continue to whip to stiff peaks—the whites should be firm and shiny.

3. With a flexible spatula, gently fold in icing sugar mixture into egg whites until completely incorporated. The mixture should be shiny and 'flow like magma.' When small peaks dissolve to a flat surface, stop mixing.
4. Fit a piping bag with a 3/8-inch (1 cm) round tip. Pipe the batter onto the baking sheets, in the previously drawn circles. Tap the underside of the baking sheet to remove air bubbles. Let dry at room temperature for 1 or 2 hours to allow skins to form.

5. Bake, in a 160C/325F oven for 10 to 11 minutes. Use a wooden spoon to keep the oven door slightly ajar, and rotate the baking sheet after 5 minutes for even baking.

6. Remove macarons from oven and transfer parchment to a cooling rack. When cool, slide a metal offset spatula or pairing knife underneath the macaron to remove from parchment.

7. Pair macarons of similar size, and pipe about 1/2 tsp of the filling onto one of the macarons. Sandwich macarons, and refrigerate to allow flavors to blend together. Bring back to room temperature before serving.

Bittersweet Chocolate Cream Ganache

- makes about 2 cups (550 grams) -

8 ounces (230 grams) bittersweet chocolate, finely chopped


1 cup (250 grams) heavy cream


4 tablespoons (2 ounces; 60 grams) unsalted butter, at room temperature

directions

1. Place the chocolate in a bowl that's large enough to hold the ingredients and keep it close at hand. Bring the cream to a full boil in a heavy-bottomed saucepan. While the cream is coming to the boil, work the butter with a rubber spatula until it is very soft and creamy. Keep the butter aside for the moment.

1. While the cream is at the boil, remove the pan from the heat and, working with the rubber spatula, gently stir the cream into the chocolate. Start stirring in the center of the mixture and work your way out in widening concentric circles. Continue to stir—without creating bubbles—until the chocolate is completely melted and the mixture is smooth. Leave the bowl on the counter for a minute or two to cool the mixture down a little before adding the butter.

3. Add the butter to the mixture in two additions, mixing with the spatula from the center of the mixture out in widening concentric circles. When the butter is fully incorporated, the ganache should be smooth and glossy. depending on what you're making with the ganache, you can use it now, leave it on the counter to set to a spreadable or pipeable consistency.

Monday, January 18, 2010

"Ghetto" sous vide hanger steak with sautéed garlic-parlsey


Sous Vide is a revolutionary way of cooking that is sweeping our nations finer restaurants day by day. In layman’s term, its basically slow poaching in an airtight bag, but it’s really so much more then that. Being able to cook a steak at exactly 120 degrees, where its just perfectly rare lets you make that perfect crust with a pink interior with consistency. The only downside to sous vide is that there is no browning of meats because of the lack of oxygen. So, let says your making a steak, you would seal it in a bag and set the machine to a low number like 125 degrees and let it do its thing for about 40 minutes, then quickly sear it on a hot grill/pan. Sous vide creates just an unbelievable texture that’s just unattainable without it, it will slowly make its way into the modern kitchen in the next 10 years.

Now, it’s expensive right now to own a sous vide machine, about $450. So thanks to David Chang of Momofuku, and his cookbook, in which he explains a way to “Ghetto Sous Vide” food, which is the same basic result of sous viding without the expensive equipment, it’s just a lot harder to keep the water at a constant temperature. Since I don’t have a Sous Vide machine (not yet at least) I opted to use Chang’s “Ghetto” way of doing it with a few modifications made by me of course.

“Ghetto” sous vide hanger steak with sautéed garlic and parsley

1 lb hanger steak

1 cup soy sauce

1 cup juice, I used pomegranate

½ onion, thinly sliced

½ Tbsp salt

½ Tbsp pepper

6 cloves garlic, minced

3 Tbsp olive oil

1 Tbsp parsley

2 pinches on red pepper flake

salt and pepper for taste

Directions

  1. Combine soy, juice, onion, salt and pepper in a bag and put in hanger steak, try to get all the air out of it, let marinade refrigerate for 24 hours.
  2. In a big pot, overfill with hot tap water, temp should be around 125 degrees, add bag with hanger steak. Let the steak sit in the warm water bath, adding hot water to keep it at 125 degrees for 45 minutes.
  3. After 45 minutes, take bag out and put into a ice bath for 15 minutes, then refrigerate.

  4. For garlic-parsley mixture, heat pan over medium heat, sauté garlic in oil for a few minutes, beat in a mortar with a pestle until combined with pepper flake and parsley, set aside.

  5. Heat a grill pan over high heat, take steak out of its bag, and dry it off. Season liberally with salt and pepper on one side. Put steak seasoned side down on pan for 7-10 minutes, season the other side and flip for another 7-10 minutes.
  6. Let meat rest off heat for 5-10 minutes. Cut in thin pieces, it will be medium rare to rare, cook longer if you wanted it more cooked.
  7. To plate arrange 4-5 slices on a plate and spoon on garlic-parsley mixture, enjoy!

Saturday, January 16, 2010

The General Greene in Brooklyn: Making other restaurants green with envy

The General Greene had been on our list of restaurants to go to for quite some time. We had heard about it from our aunt and uncle who raved about it, and we’ve wanted to go ever since. The restaurant itself screams hipster from its location in Fort Greene to its customers who were full of facial hair and flannel. It had a very homey and relaxed feel to it.

(Photo courtesy of Erin Zimmer of Serious Eats)

Now to the food, chef Julie Farias knows what she’s doing. She uses small plates and cheap prices for a family style-sharing menu, which is full of fatty morsels of American cuisine. In that way, it’s very comparable to the Brooklyn Star, but certainly not as heavy as that meal which had me full for two days.

(Photo courtesy of Erin Zimmer of Serious Eats)

The first few dishes we got were the chorizo salad ($12), mac and cheese ($8) and potato gratin. The salad was very filling for a salad, the chorizo was as good as chorizo gets, and it paired very well with the arugula and roasted peppers. The mac and cheese was, in my opinion under-salted, however, it was very cheesy and fattening which I always love. The potatoes gratin were fantastic, lightly kissed with nutmeg, it was creamy, cheesy and just plain awesome.

(Photo courtesy of Erin Zimmer of Serious Eats)

The entrees we ordered were the grilled steak with smoked garlic ($13), candied bacon ($5), salt and pepper ribs ($13), kale with garlic and the roasted chicken ($15). All were very exceptional except for the ribs, which came with a spiced yogurt sauce, which was interesting to say the least, but did not pair well with the ribs. The steak was a great deal, the smoky garlic added a nice kick to the perfect medium rare steak. The chicken was one of the highlights of the night; seasoned with cinnamon and nutmeg it was something different, in a good way though. The juicy and tender meat sealed within the perfectly crisp and golden brown skin was mouth-watering. The thick cut bacon, doused in a maple sugar was good, not great, a little too sweet and it’s becoming a gimmick in the restaurant world.

(Photo courtesy of Erin Zimmer of Serious Eats)

(Photo courtesy of Erin Zimmer of Serious Eats)

The desserts really elevated the meal to a very good one. The salted caramel sundae ($7) was ridiculously refreshing and tasty. The pretzels added a much-needed crunch to the homemade ice cream, which was perfect. The gianduja pudding was so creamy and velvety, it was best chocolate pudding I’ve ever had. The chocolate chip cookies ($5) were everything you want in a great cookie: chewy, crunchy, gooey, chocolaty, warm and salty. These are some of the best out there, a must have.

(Photo courtesy of Erin Zimmer of Serious Eats)

The General Greene was definitely a winner in my book. The desserts really blew me away; they were fantastic; creamy, gooey and delicious. The rest of the food was good, not great with the exception of the chicken, which I thought was very well done. The General Greene absolutely will be a staple in Fort Greene if they keep on churning out food like tonight.


(Photo courtesy of Erin Zimmer of Serious Eats)


Cheesy bacon hash and a fried egg with bacon infused red-eye gravy

I wanted to make a really hearty breakfast to start off my weekend, something that’ll keep me going. I just love the versatility of eggs and potatoes; the possibilities are truly endless. I like to keep the yolk intact when I make eggs, because the texture and taste of that smooth yolk is wonderful. And who doesn't love bacon, well maybe vegetarians don’t haha, but I don’t have to worry about that since no one in the family is one. The bitterness of the coffee in the gravy really helps offset all the salt from the bacon in this dish. This breakfast will really get your morning started and keep you going for the whole day.

Cheesy bacon hash and a fried egg with bacon infused red-eye gravy

½ large potato, shredded

2 slices bacon, chopped

1 egg

1 Tbsp butter

1 Tbsp flour

2 Tbsp less than ¼ cup of coffee

2 Tbsp chicken stock

2-½ Tbsp asiago cheese, shredded

Salt and pepper for taste

Directions

  1. Render fat out of bacon in a small pan, which you will use for the gravy. Remove bacon with a slotted spoon; add to shredded potato and cheese mixture.

  2. Add flour and butter to rendered fat, stir to combine for a minute, add coffee and stock, stir vigorously.

  3. Heat another pan over medium heat and add a little butter to that, cook the hash on each side for about 2-3 minutes until golden brown.
  4. To fry egg, crack into a pan and cook on one side for about a minute then flip for 20-30 seconds.
  5. To plate place egg and hash side by side with a little pool of gravy next to it. Garnish with parsley.

Tuesday, January 12, 2010

Cereal milk panna cotta with mint and chocolate sauce

Panna cotta has become my "white whale" of sorts recently. I’ve tried on 3 separate occasions to make what I thought was this very simple dessert, and I’ve failed to some extent each time: twice when it did not set correctly and once where it was just bland. However this panna cotta is packed with flavors. The cereal I used was Cinnamon Toast Crunch, which is just a punch of cinnamon and sugar; it brought a lot of flavor to the custard.

This recipe is a combo of my mom’s friend’s recipe she got when she took cooking classes in Italy, and I’m thankful she shared it with me. The other part of it is the famed Momofuku cereal milk panna cotta with praline ganache and avocado puree. I liked the idea of cereal milk for the panna cotta, and decided to use a really sugary one like cinnamon toast crunch, I thought it would pair really well with a mint sauce, and both go with chocolate so I added that for a little contrast. Finally, since everything was the same texture I wanted to add a nice crunch to the dish, so I toasted some hazelnuts and walnuts, then I candied them with some sugar and volia, texture!

Cereal milk panna cotta

1 L cream

75 grams fine sugar

3 gelatin sheets

3 cups cereal, I used Cinnamon Toast Crunch

5-10 mint leaves and steams

2 Tbsp milk

Chocolate syrup

½ cup hazelnuts and walnuts

Directions

  1. Heat oven to 350 degrees. Place 3 cups of cereal on pan with nuts and toast for 10 minutes.
  2. Toss nuts with sugar in a pan over low heat and then place in a bowl to let cool.
  3. Steep toasted cereal in 1 liter of cream for 40 minutes. Strain into a separate bowl, then strain again into a saucepan.
  4. Heat cream until simmering, bloom gelatin sheets for 3-5 minutes in cold water, then wring out and add to hot cream. Stir cream mixture until gelatin sheets dissolve.
  5. Pour cream into 5-8 bowl/ramekins and refrigerate for at least two hours and up to a few days.
  6. For mint puree, combine milk and mint in a blender, blend until combined.
  7. To place, run a knife down the side of the panna cotta and place a plate on top of it and flip. Pour a Tbsp of the mint puree onto the side of the plate, right next to it make a circular dollop of chocolate syrup and top with the candied nuts, enjoy!

Monday, January 11, 2010

Apples four ways


I really wanted to explore my creativity in the kitchen today, so I took something very simple like an apple, and used my culinary knowledge to make four separate dishes out of it. This little exercise helped me gauge my strengths as a chef. When you really think about it, the possibilities are endless with such an ordinary food, every aspect of taste comes into play; texture, smell, flavor and sight all must be taken into account.

The first cut I did on the top right was a paper-thin disk of green apple with fragrant naval orange zest and crunchy candied hazelnuts and walnuts. The one below it is a caramelized apple in brown sugar and butter. To the left of that is diced apples, topped with rice krispies cereal and Hawaiian pink salt. On top of that is a chiffonade of apple skin, with a small dollop of some left-over swiss chard and bacon puree I had from the other night.

Apples four ways

1 apple

½ Tbsp brown sugar

1 pat butter

2 Tbsp rice krispies

A pinch of pink salt

½ Tbsp orange zest

½ Tbsp candied hazelnuts and walnuts

½ Tbsp of swiss chard and bacon puree

Directions

  1. Cut apple in half, peel one half of it and do a chiffonade of the skin, set aside.
  2. Dice a fourth of the apple and put in a pan over medium heat with brown sugar and butter, let cook for 5-10 minutes.
  3. Dice another fourth of the apple and set aside.
  4. Using a mandolin, make 4 paper thin slices, use the best two.
  5. To place, top thin apple slice with zest and nuts, place 4-5 cubes of caramelized apple on the plate below it. To the left of that, put down to diced apple pieces and top with rice krispies and salt, and above that arrange the skin strands in a mound of sorts and place a dollop of puree on top, enjoy!

Wednesday, January 6, 2010

Seared sea scallops with swiss chard and bacon puree and Sriracha

Scallops are probably one of the easiest fish to make into something delicious because they already have so much natural flavor that all you have to do is add salt and pepper. Sea scallops are the big and thick ones, while bay scallops are the tiny ones. After being quickly seared in some butter they develop a perfect crust, sealing in the awesomeness of the flavor.

For the sauce, I made a puree of Swiss chard and bacon. It’s earthy, bitter, salty and smoky all at once and adds a nice balance to the flavorful scallop. The Sriracha is there to add just a touch of heat to the dish.

Seared sea scallops with Swiss chard and bacon puree and Sriracha

4-8 sea scallops

1 Tbsp butter

2 slices bacon, chopped

4-5 big leaves of Swiss chard

½ cup water or chicken stock

2 Tbsp olive oil

2 Tbsp Sriracha

Salt and pepper

Directions

  1. Heat a pan over medium heat and sauté bacon for 5 minutes. Add Swiss chard to the bacon and cook until tender. Transfer to a blender and stream in oil, water and stock while you puree.
  2. Heat the pan to high. Pat the scallops dry and make sure they are clean by removing the tough muscle on its side. Salt and pepper the scallops. Melt the butter in the pan. Sear the scallops for 3-5 minutes on each side.
  3. To plate, spoon on some puree and using the back of your spoon push it in a curve; dab on some Sriracha as well. Then place 2-3 scallops on the end of your puree/sriracha.

Deviled Eggs

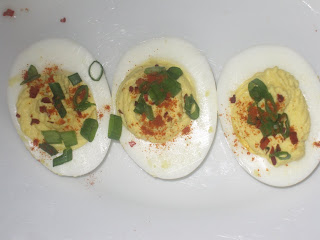
My uncle Mike sent me an email the other day, containing the recipe for one of many famed dishes at The Spotted Pig: deviled eggs. These little bites are full of flavor and pack a punch from the vinegar and mustard. This is my second recipe from The Spotted Pig, in which i've made adaptations to make them unique and my "own". I added the pancetta to the gnudi’s before (see post on 11/3/2009) and with these eggs, I added smoked, sweet paprika for a kick.

Deviled Eggs a la Spotted Pig

6 large eggs

1 tablespoons extra virgin olive oil, plus more for drizzling

1/2 tablespoon mayonnaise

1/2 tablespoon Dijon mustard

1 teaspoon white wine vinegar

1/2 teaspoon malt vinegar

Sea salt

Red chili flakes, pulsed in a spice grinder into approximate 1/16th-inch pieces.

2 tablespoons thinly sliced chives or scallions

1 tbsp paprika

Directions

  1. Place eggs in single layer in medium saucepan. Cover with 1 1⁄2 quarts cold water. Place over high heat, bring to a simmer, shut off heat, and wait for at least ten minutes.
  2. Drain eggs, and peel under cool running water. With thin knife, carefully slice eggs in half.
  3. Scoop the yolks out of the whites carefully with a spoon.
  4. Place egg yolks in bowl of food processor. Add olive oil, mayonnaise, mustard, and both vinegars and process until smooth puree forms, scraping down sides of bowl as necessary. Season to taste with salt.
  5. Transfer mixture to pastry bag fitted with plain tip or to plastic zipper-lock bag with corner cut off. Select 12 best egg white halves, and pipe filling mixture into them by starting outside the indentation, completely filling the indentation, and overflowing the other side of it, leaving a curled “tail” at the end.
  6. Sprinkle eggs with Maldon salt, chili flake, and chives. Drizzle with olive oil, and serve.

Friday, January 1, 2010

Ponzu-butter corn and swiss chard with shredded pork belly

Since I had some leftover pork belly from the buns I made earlier, I decided to make a very porky side dish. I bought some corn and swiss chard on Arthur Avenue the other day, so I sautéed the corn with some butter and garlic, then added the chard and some ponzu(soy and citrus sauce) for flavor. Just before serving I added the fatty pork and the result was awesome! It was salty, sweet, and bitter, it even had some umami (earthiness), it was quite the flavor bomb.

Ponzu-butter corn and swiss chard with roasted pork belly

1 cup shredded pork belly

3 ears of corn

3-5 big leaves of swiss chard

3 Tbsp ponzu sauce

1 clove garlic, minced

2 Tbsp butter

Salt and pepper to taste

Directions

  1. Cut off kernels from cobs of corn, toss with salt and pepper.
  2. Melt butter in a pan, add garlic to butter.
  3. Add corn and ponzu sauce, sauté for 5-7 minutes.
  4. Add swiss chard and cover for 5-10 minutes until chard is tender.
  5. Add pork belly and toss to combine.
  6. To plate, place about 3 Tbsp of the corn/chard/pork on a plate and put some sliced green onions and a dash of ponzu sauce.